Clips
Clips are snippets of text you can store in Nova for quick and easy reuse, in both the Editor and in Terminal tabs. They let you easily insert entire blocks of code into documents using shortcuts of your choice, such as key bindings, trigger phrases, or as completions. Clips can be set as global, project-specific, or syntax-specific, so that specific Clips will appear only when they are contextually appropriate.
You can manage your Clips from the Clips Sidebar.
Creating Clips
To create a new Clip, select the Clips Sidebar from the Sidebar Dock, or from the View menu > Sidebars > Show Clips Sidebar. Along the top, you’ll find three options:

- Global
- Clips that can be used in any Nova project or window.
- Project
- Clips that are specific to the current Nova project. Not available for remote projects.
- Extensions
- Clips provided by installed Extensions. (You can’t manually create Clips here.)
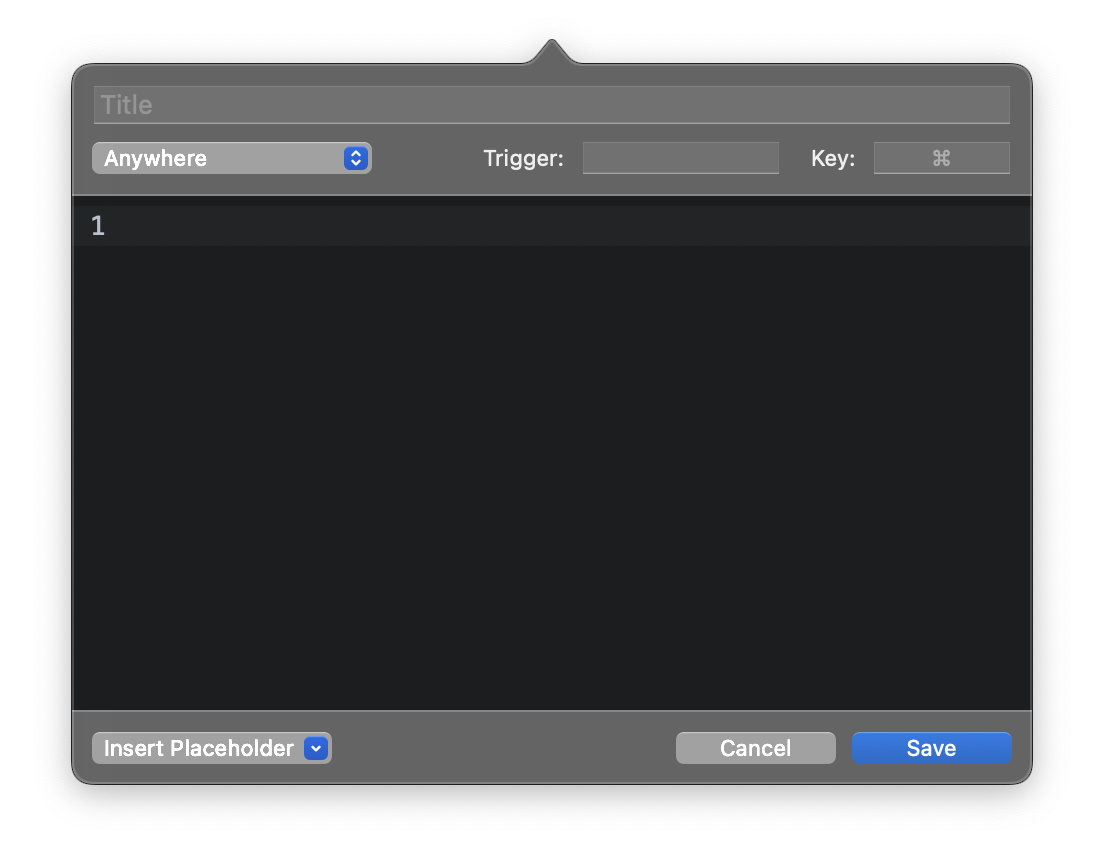
Select either Global or Project based on where you want to use the Clip. Then, click the + icon in the top-right corner, and select Add Clip.
Clips consist of a few essential components:
|

|
- Trigger
- A shorthand phrase which you can type into the Editor or Terminal, then press Tab to expand the Clip in its place. Case-sensitive.
- Key
- Set a key binding you can press to insert the Clip. Must include a modifier key, such as ⌘Command. The binding also cannot conflict with existing key bindings, including those set in Settings > Key Bindings.
- Clip Contents
- The main component of any Clip is its contents. Using the editor view in the New Clip popover, enter the text you want to use in your Clip.
Once you’ve created your Clip, just click Save, and it will be available for use.
Placeholders
One powerful feature of Clips is the ability to use Placeholders. Placeholders are special markers you can put in your Clip’s contents that will be replaced at the time the clip is inserted.
Named Placeholders
Named placeholders effectively act as blank spots in your Clip, turning it into a template to be filled out. You can give these spots a ’name’ to help identify what you should replace them with after inserting the Clip.
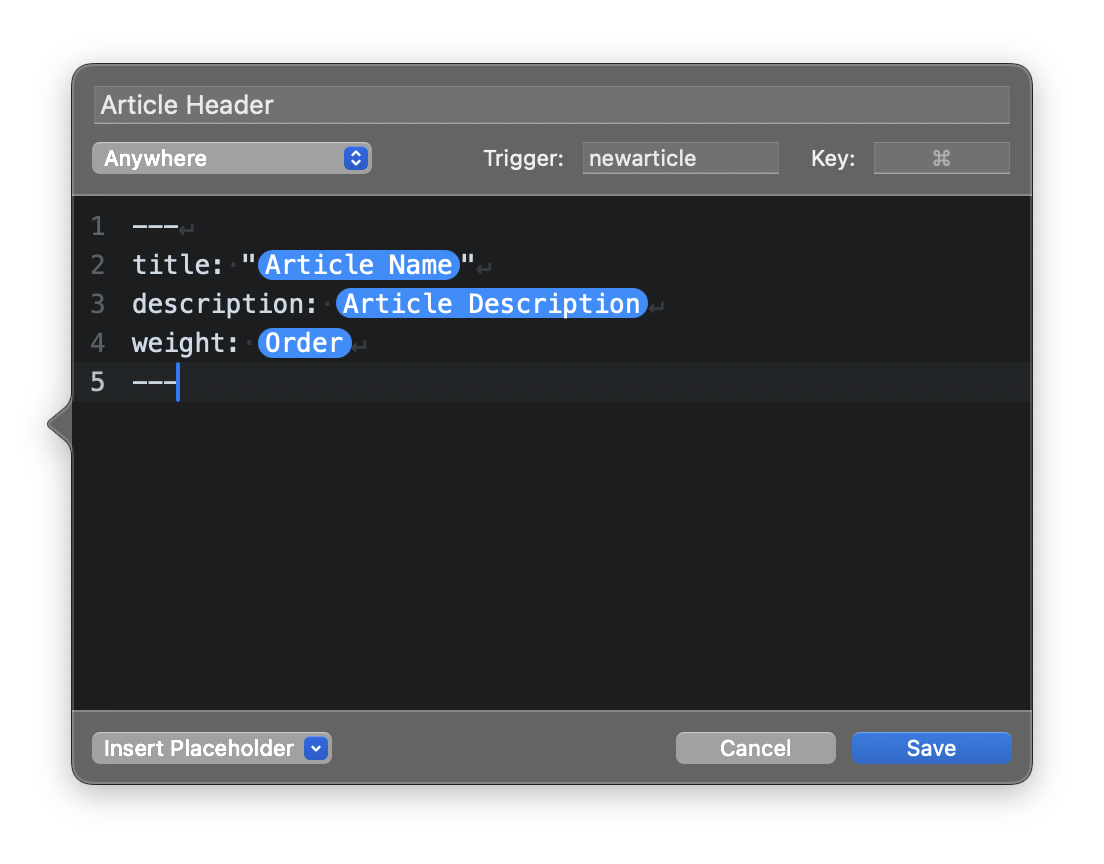
When inserting a Clip with named placeholders, the cursor will automatically be inserted in the position of the first placeholder, allowing you to type over the placeholder. Press Tab to instantly jump to the next named placeholder spot. For instance, take this Markdown clip for easily inserting a header into a new article for a static site generator:

After typing newarticle and pressing Tab to insert the Clip, the cursor will automatically be placed at the Article Name placeholder, and pressing Tab will jump to the next placeholder. This enables you to quickly replace each placeholder with the necessary content, with each placeholder’s name reminding you what to replace it with.
Dynamic Placeholders
Aside from named placeholders, Nova also supports several dynamic placeholders. When used in a Clip, they will be automatically replaced upon insertion with contextual information:
- Date
- Inserts the current date. The format used for the date is based on the Date Format set in macOS’s System Settings > General > Language & Region.
- Filename
- The name of the file the Clip is inserted into.
- Parent Folder
- The first ancestor folder of the current file.
- Project Name
- The name of the current project in Nova, if any.
- Author Name
- Your author name from your Git configuration.
- Source Control Revision
- The hash of the most recent Git commit.
- Insertion Point
- This placeholder positions the cursor in its place upon inserting the Clip. For instance, you can make an HTML Clip like this:
<div class="example">(Insertion Point)</div>- … and your cursor will be placed in the middle of the
<div>tag when inserting the Clip, allowing you to get right to typing the contents of that element. - Text Selection
- If text is selected when inserting a clip with this placeholder, then the Clip will be inserted relative to the selection. For instance, an HTML Clip like this:
<div class="example">(Text Selection)</div>- … will wrap any selected text in a
<div>tag. - Previous Text
- This placeholder allows you to insert a Clip relative to the previous word in the editor. For instance, a Markdown Clip like this:
**(Previous Text)**- … will wrap the previous word to the left of the cursor in asterisks to make it bold.
- Pasteboard
- This placeholder will be automatically replaced with any copied text in your Pasteboard when the Clip is inserted.
Inserting Clips
There are four primary ways to insert a Clip into a document:
- From the Clips Sidebar
- Simply double-click a Clip in the Clips Sidebar to insert it in the document or Terminal at the current cursor position. You can also drag Clips from the Sidebar into the Editor and place them at any position.
- Trigger Phrases
- Type the trigger set for the Clip into the Editor, then press Tab. Your Clip will be expanded in place of the trigger. Not available in the Terminal.
- Key Bindings
- Press the designated key binding for a Clip to insert it into the Editor or Terminal at the current cursor position.
- As Completions
- If enabled in Settings > Editor > Editing, relevant Clips (based on title, syntax mode, and contents) will be offered in the list of completions that appears while typing in the Editor. Simply select one and press Return or Tab (depending on your settings) to insert it.
Managing Clips
|
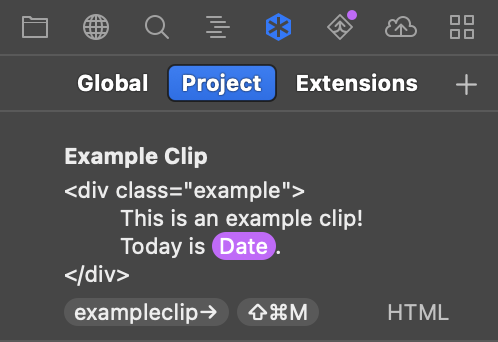
The As described in the Creating Clips section above, the Clips Sidebar is divided into three categories of Clips, which you can switch between using the buttons at the top of the sidebar. Global Clips are accessible in any Nova window, Project Clips are specific to the current Nova project, and Extensions lists any Clips that are bundled with Extensions you’ve installed. |

|
Below these options, you’ll find your actual Clips. Each Clip will display its Title at the top, above a preview of its contents. Along the bottom, you’ll see the trigger phrase, key binding, and syntax mode set for the Clip, if any.
Double-click any Clip to insert it at the current cursor position in the Editor. Right-click a Clip to access the context menu, where you can choose to edit, duplicate, or delete the selected Clip. You can also delete a Clip by simply selecting it and pressing the Delete key.
You can also drag Clips from the sidebar into the Editor, or even to other apps on your Mac. Clips dragged out of Nova can be dropped into any app that accepts text input, including web browsers, word processors, or other editors.
NOTE: Placeholders will not be completed when dragging Clips outside of Nova. They will instead appear as variables, such as
$DATEor$SELECTED_TEXT.
Along the bottom of the Clips Sidebar, you’ll find the Filter field. Type the title of a Clip you’re looking for into the Filter field, and the Clips Sidebar will show only Clips whose title matches your query.
Clip Groups
Clips can also be organized into groups, which act as ‘folders’ in the Sidebar. For instance, you may want to organize all your TypeScript Clips together into a group, or all the Clips you use for certain Terminal commands.
To create a Clip group, click the + icon in the top-right corner of the Clips Sidebar and select Add Group. You can give your group a name to distinguish it. Then, simply drag your desired Clips into the group folder to organize them. Groups can be collapsed or expanded as needed.
Importing and Exporting Clips
You can export your Clips to a .json file from the gear icon in the bottom-right corner of the Clips Sidebar. Simply click that icon, choose Export Clips…, then select where to save the file. You can then use the matching Import Clips… command to import your Clips to another Nova installation.
By default, with no Clips selected in the sidebar, the Export Clips command will export all your Clips. You can also export individual Clips, or groups of Clips, by first selecting them in the Sidebar. Then, right-click to open the context menu, and choose Export Clips from there.
|
← Previous Issues and Warnings |
Next → Text Actions |